shadow

Additional illuminations

Sophie wrote, “Oh what beautiful illuminations, and what a shame I have no space for them in my panel!”

A:Thank you for wanting to further enhance our scroll, and for your perfectly timed comment. Several artists have donated original artwork for inclusion in our scroll, and I am in the process of reworking them into cross-stitch patterns.
One of each design will be made available as a kit, and will be announced in a MailChimp newsletter.
If you would like to create your own design or know other artists interested, please let me know. We are looking for artwork that illuminates specific passages of themes.


What will happen with our panels?

Many people have asked: Where will the Torah be when it is finished?

A: When Torah Stitch By Stitch was launched in June I was not at all sure we would ever achieve a completed scroll. The primary goal of the project still remains: “to engage with words of Torah” on a personal level.

By early September there were 300 stitchers in 9 countries; a month later we are 420 stitchers in 12 countries . . . and it now seems very likely that people will sign up for all of the 1463 portions. The panels already completed are beautiful, and the anecdotes people are sharing about their portion and stitching experience are profoundly moving.

Everyone who works on or contributes to the project will be acknowledged, at least in a digital catalogue. Already the data base and image archive are substantial, and that is growing each day as people submit their process photos, anecdotes, acknowledge those to whom they dedicate their stitching, etc. Application for funding for a documentary film is in process.

As to the exhibition and final disposition of the project: that depends on many factors. We have created a design for assembling the pieces so that all sections are visible and all components disassemble into manageable parts for shipping. We also have a wish list of museums to approach.

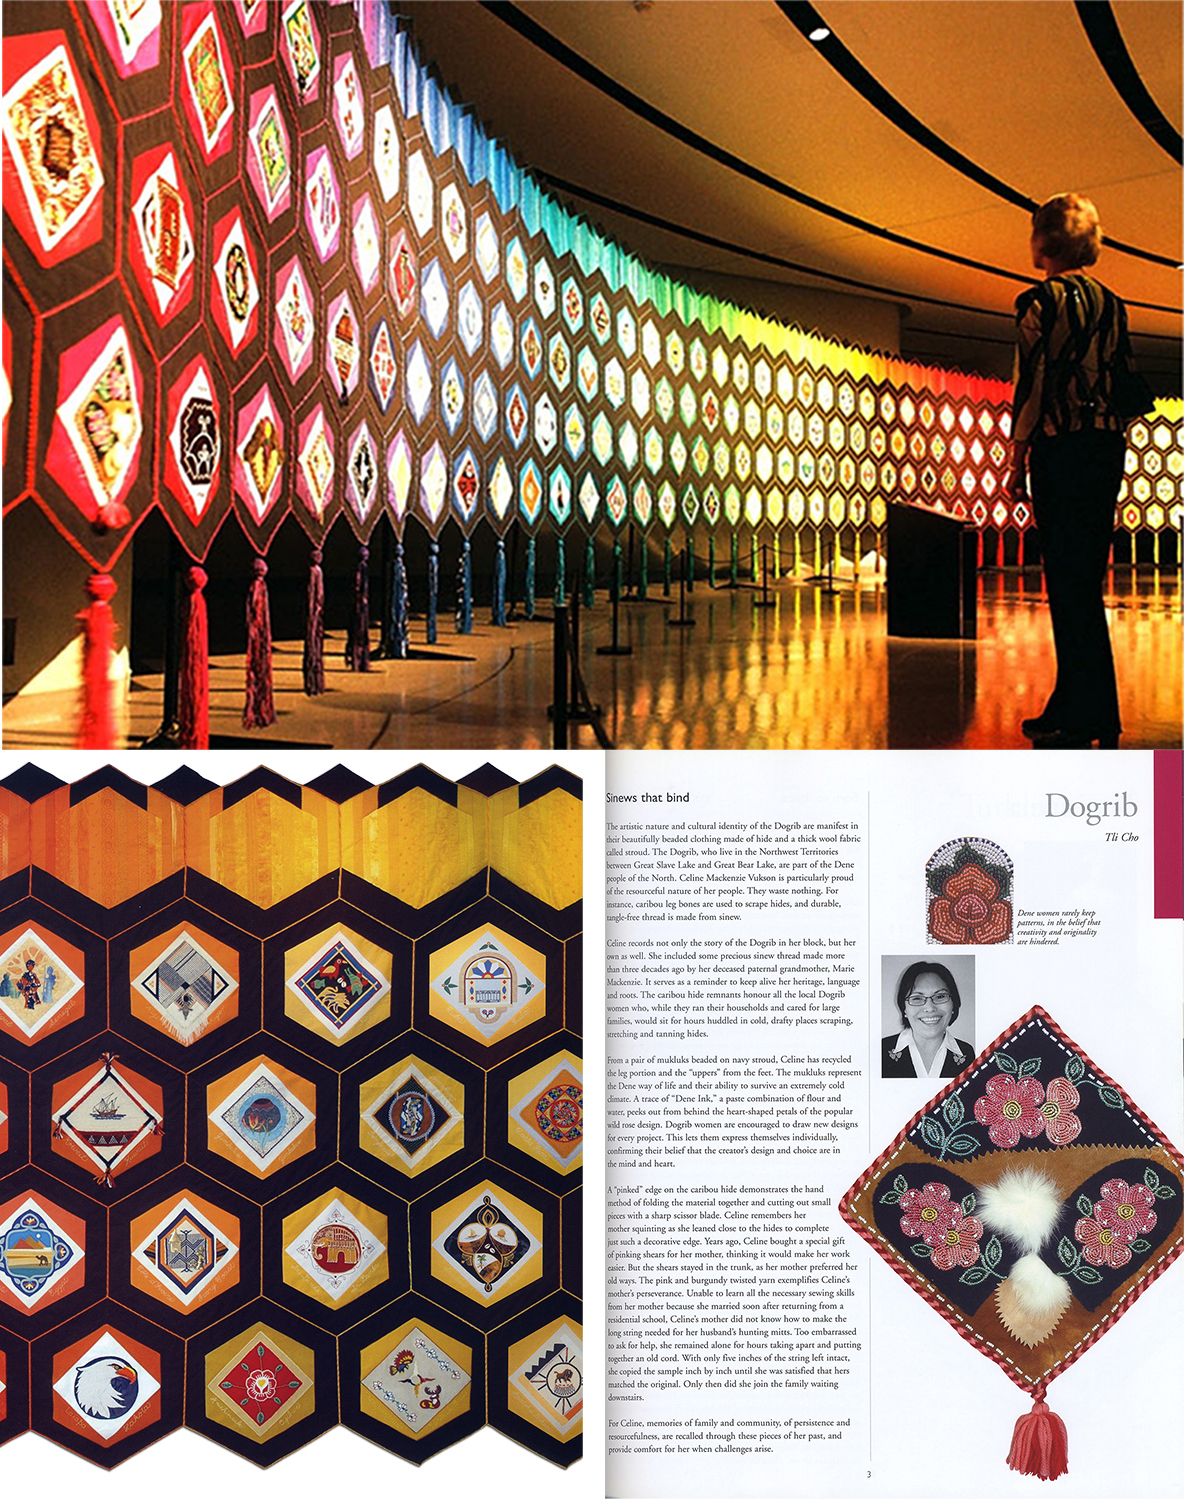
Take a look at the website of “Quilt of Belonging” and you will have a sense of how things may evolve in terms of documentation and exhibition.

Three very capable women have joined me as volunteers to tend to both the day-to-day tasks, as well as longer term needs such as: developing a business plan, applying for charitable status, forming a Board of Directors, applying for grants. Ultimately the extent to which we can take Torah Stitch By Stitch into the world of museums and publications will depend on successful fundraising.

We will keep you posted and seek your ongoing support.

Q of B comp for wp

Colonial knots for taggim?

Eve asks: The pattern notes that the taggim can be created with a straight stitch and a french knot. Can we use colonial knots instead? Some people find them much easier to execute and from a distance, they’re near identical.

A: Colonial knots are a great option if you enjoy doing them.
Eve further suggests a page from the website of Mary Corbet on the two knots:
http://www.needlenthread.com/2012/06/the-french-knot-vs-the-colonial-knot.html

Colour palette

Margo comments: I think the colour palette should include a green.

A: Margo, you are not alone in that preference. A moss green has been added, and the other colours tweaked. However, part of the reason I restricted the palette is to encourage stitchers to think imaginatively . . . in the spirit of mediaeval manuscript illuminators and/or early 20th century impressionist painters.
MS and Derain
In the case of the former, permanent colours were restricted to those made from ground up minerals, mostly gold and semi-precious stones. You may have noticed in old tapestries that mainly reds and blues have survived the centuries; yellows and greens tended to be plant-based dyes and not colourfast.
Around 1856 aniline dyes were invented, and that afforded typically cash-strapped artists the opportunity to explore a full range of colours (and to take aspirin for their aches and pains;-). See aniline Some painters, including André Derain, whose Trees is shown above embraced high-key colours with such exuberance that they were called Fauvistes (Wild Beasts). Even though their use of colour and form was vigorously unrepresentational, there is no ambiguity in what they are portraying.
Derain and Matisse portraits

Uneven margins . . . “extra” aida cloth . . . embroidery hoops

Lisa asked: I finished my first row and realized that the margin at the left side is wider than the margin at right side. Since I counted carefully, I’m assuming I may have turned the fabric the wrong direction. Is it possible to cut off and finish that seam? I also noticed that there are several inches extra at the bottom of the fabric. Can it be adjusted when pieced together?

Would it help to have the top and bottom marked on the fabric before the kits are sent out?

A: The first row is the most difficult, and hopefully stitching will flow more easily after this.

Yes, there is some extra space at the left side and there may be some at the bottom depending how long your portion is. The canvas is cut as a square to accommodate 13 lines of text, which is the longest portion I gauged. Your “extra” bottom space is for your creative treatment, if you decide to do that. But note that there is a precise “picture plane” boundary, indicated by the orange dashed line on your template.

Although your suggestion of marking the 4 corners is a good one, I really couldn’t do that with complete precision on unstitched aida cloth that is subject to the vagaries of humidity and tension. That is the reason why positioning the first line accurately is so crucial.

Don’t cut away any “extra” cloth. We’ll deal with it at the assembly stage.

Correcting mistakes . . . even starting again

Several people have broached this subject. They realized, usually within the first line of stitching, that something was not right.

They also worried that taking out their mistakes would ruin the aida cloth.

By all means start again. Craftspeople do that often.

A primary goal of the project is a word-perfect version of the text. The aida cloth is very sturdy, and will definitely withstand “un-sewing”. Just be careful not to rip the fabric. You may wish to begin your text again on a fresher surface by turning the cloth 180• Don’t cut away any cloth, since it will be all be used in assembling the scroll; however, process markings are often part of finished works of art.

You will hopefully be much happier when you know you have it right, and the project will definitely benefit from your care.

Cautionary hint: All of the stitchers who encountered problems realized that they had not followed the printed template accurately. They missed the correct letter height, didn’t extend letters as drafted, thought that all spaces between letters or words were the same. Please follow the template exactly; every square on the diagram has meaning, as does your every stitch.

Stitching G-d’s name(s)

tetragrammaton
G-d’s name

Some participants have expressed concern about the propriety of stitching the Tetragrammaton or others of God’s names.

This response comes from Izzy Pludwinski, our resident Sofer STaM:
“The prohibition is against erasing God’s name – not in writing it. . . There is no problem in writing God’s name if done with a purpose. When one writes God’s name when writing STaM one says “This Name I am writing for the sanctity of the Divine Name (Shem Hashem).
שם זה אני כותב לשם קדושת השם
In STaM if one does not say it then the object ( mezuza, tfillin or Sefer Torah) would be invalid. In stitching there is no object to invalidate, but one should have the proper intention.”

The halachic prohibition is against destroying holy objects that contain any of God’s specified names. That is the reason for consigning such items to a geniza, and ultimately burial in sanctified ground.

Stitchers who want to do a 4-verse section that does not contain any sacred names can make that request in their registration application.

Borders

Yola asked: Do the borders have to be cross stitched or can another stitch be used; for example a Smyrna stitch?

A: Borders provide an opportunity for individual expression. So long as you observe the guidelines for borders regarding colours, size, positioning; and your embroidery does not distort the surface or tension of the aida cloth, other stitches may be used.
See the BORDERS ALERT! page in the Design and Technique section.

Positioning The First Stitch

Q: How important is the position of the first stitch?

A: VERY IMPORTANT!
The project has been designed so that when the panels are assembled the areas of text will align and form columns as they do in a Torah scroll. We need several rows of canvas at the top and sides for seams.
Alongside the text there are 7 squares reserved for a border – actually 2 open squares + up to 5 for the border design – if the stitcher wishes to do that. There will be much more information on that option in later posts.